I often see similar problems in various NAS groups, forums and other platforms: How to use synchronization and backup? Is the snapshot used? I have a backup, but also do not use snapshots? How can I make my data more secure? The main reason for these problems lies in the fact that there are too many online websites saying that these functions are good, but they do not say why they are good and how good they are.
The data security of Synology NAS is mainly based on the common support of three big players – Synchronous Cloud Station, Backup-Hyper Backup and Snapshot Replication. Users who use Synology NAS for the first time will not know how to distinguish between them and Which one to choose as their own pioneering data protection? So, I seriously thought about life, Abu, I thought about how to make it a little deeper... Cough and Cough. I actually thought about how to use simple examples to perform these three major data security suites. Detailed explanation, please drink saliva, then I'm going to start
Synchronization=Cloud Station=C
Backup=Hyper Backup=H
Snapshot=Snapshot Replication=S
Synchronous, backup, and snapshot can be collectively referred to as CHS. It is the most important data security suite in Synology's DSM system. Its importance is as lofty as that of the .avi files in your computer named after the CHN and ipz serial letter serial numbers.
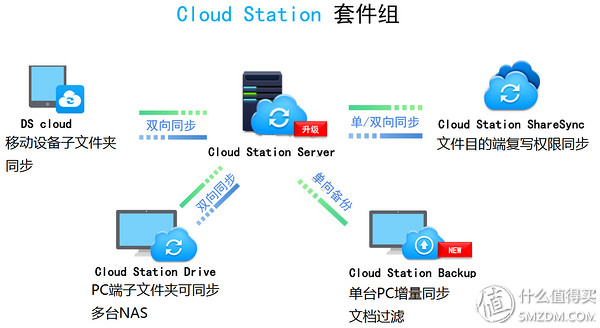
Cloud Station is the collective name of the synchronization function suite. Cloud Station Drive and Cloud Station Backup can be applied to every computer that needs data protection and stored in Synology NAS. The Home or homes folder, on the one hand, can synchronize files on your personal computer at any time; on the other hand, you can ensure that up to 32 copies of files on your computer can be traced back.
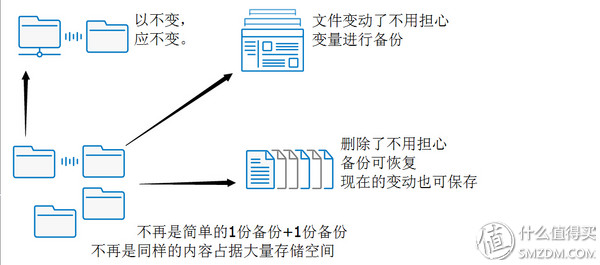
Backup (Hyper Backup) is the most important protection method of Synology NAS internal data (synchronization is mainly between the computer and the NAS), you can use the backup or homes folder to generate a proprietary file format, backed up by variables. The method is stored on the NAS local machine or another Synology NAS, and it is possible to use the local copy or remote copy to periodically copy the file. DSM6.1 has two major changes to the backup, one can load the backup destination folder, and then in the Windows system can open the corresponding folder to view or restore the backup file; the second is based on the original variable backup, to achieve Cross-folders to duplicate data backups.
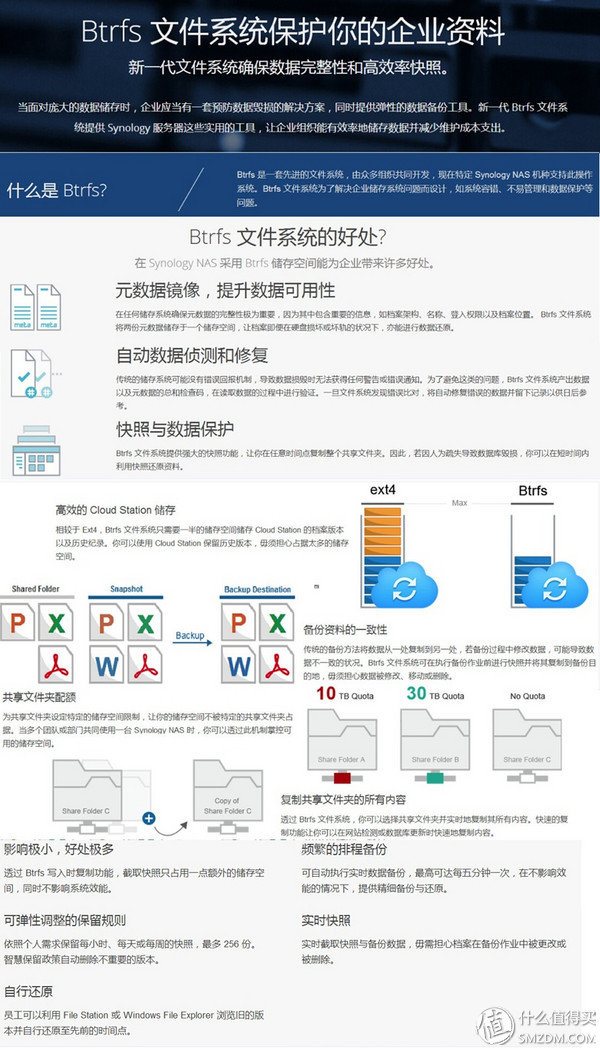
The image files generated by Snapshot Replication are visible in the protected folder and stored in the same storage volume. Therefore, you must choose the snapshot frequency and saved quantity carefully. Note that snapshots can take snapshots of the home or homes folder, but the two folders cannot be saved to another Synology NAS by using the copy function. The ease of use of the Btrfs format may not be high on ext4. The problem can not be connected to the computer like ext4 mode hard drive through Ubuntu to rescue.
Popularly speaking, the Cloud Station Suite function group is to invert files on the platform such as a computer and Synology NAS. There is a traitor Cloud Station ShareSync, which inverts files between NAS and NAS; Hyper Backup and Snapshot Replication snapshots The two suites are all protected by files between Synology NAS internal folders and between NAS and NAS. The difference is that backup is a proprietary format to protect files, not only by deduplicating files and cross-file comparisons. To save the backup space, once the backup is generated, it is possible to backup only the data variables to save the backup space; the snapshot is a hard disk that requires a proprietary Btrfs format, and each snapshot is a mirror.
For the boring and blunt distinction, please see the following Synology website comparison chart:
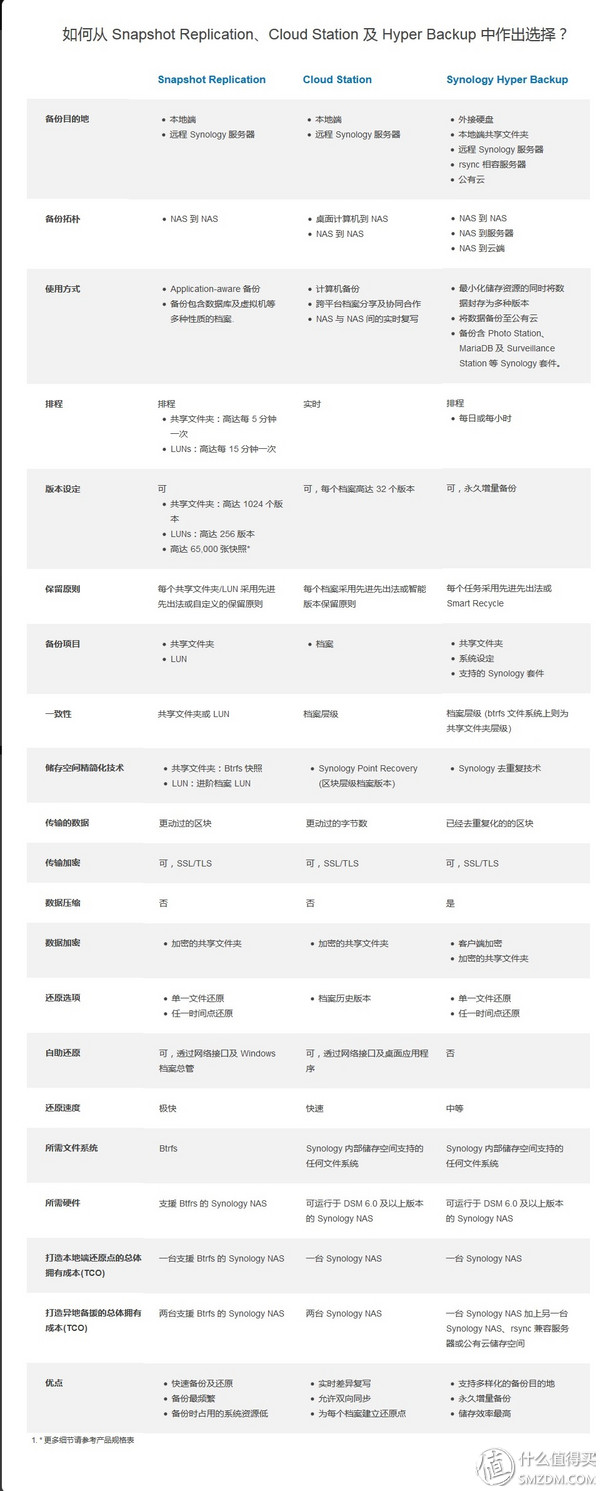
If you understand the above picture, you will understand. If you don't understand it, don't worry about it. Because then, I will explain the operation methods one by one in detail.
Cloud Station
The Cloud Station suite is actually a suite of five function modules. The Cloud Station Server is the server end of the Cloud Station on the NAS; Cloud Station Drive and Cloud Station Backup are computer-side softwares. It is a two-way synchronization between the computer and the NAS. Backup is a one-way backup from the computer to the NAS. Cloud Station ShareSync is the synchronization between the Synology NAS and the NAS. The DS Cloud is a mobile app.
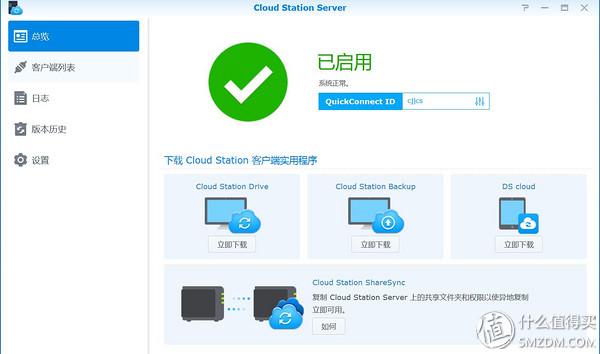
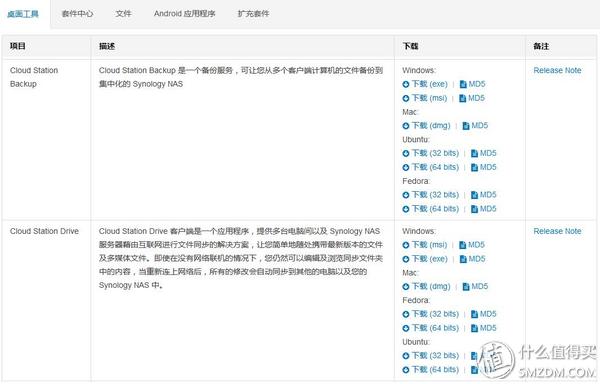
First, install Cloud Station Server Suite on Synology NAS, and download the PC software through the main interface of Cloud Station Server or Synology. Notice that Drive is synchronous and Backup is the backup.
→ Cloud sync Cloud Station Drive
The installation process is relatively simple, select the directory installed on the computer
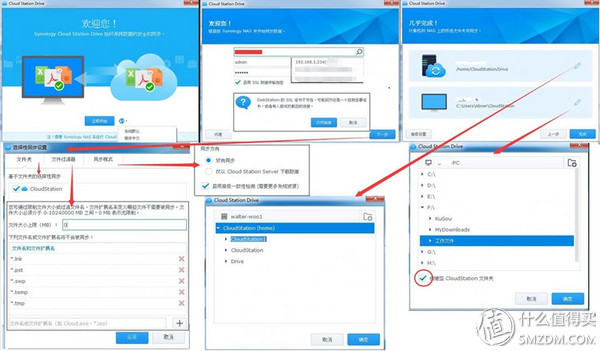
Because Cloud Station is the functional foundation for enterprise and personal cloud services, the next part of the setup is very important. The focus of cloud services is to synchronize files, and the best way to do it is to complete it without knowing it. Therefore, you must set the synchronization options according to your needs. You need not specify folders. Note that the red circle in the lower right corner will create a new empty folder in the selected folder. In the advanced options, you can set file filtering to filter the file size and suffix name that you do not want to synchronize.
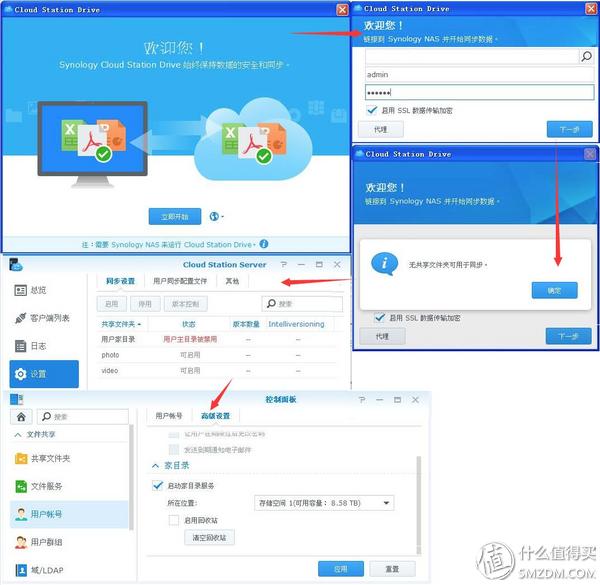
Don't worry if there are no shared folders available for synchronization, open the user directory service can be broken
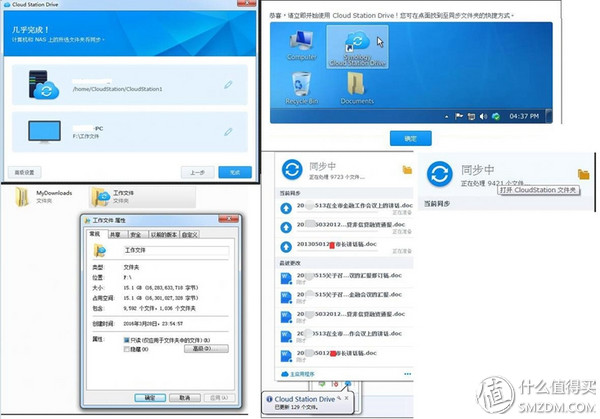
In my own example, I need to synchronize the file in two parts, one is to synchronize the work file at home (in previous years, I have backed up to the home file, the volume of files is 15.1G, 9592 files, 1036 folders, as above (Figure), the other is the historical work file of the synchronization unit 2016 (the figure below is). The file size is 1.21G, 494 files, 92 folders. Here is a display problem, that is, the number of files I view in the win7 attribute is 9592 files, but Synology's software displays a higher number of synchronized files than this number (above is more than 9700). In terms of synchronization speed, the DS916+ and DS216+II are faster than the 216j and should be caused by a gap in performance. Starting from the DSM 6.0, the Cloud Station can synchronize the small files (large amounts of Words, tables, and photos) from the previous version. Greatly improved, DSM 6.1 still maintains this optimization speed and feels even faster than direct copying.
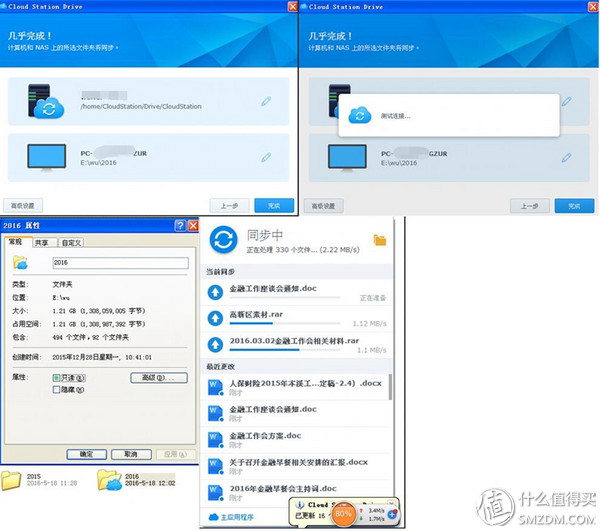
The synchronization file in the unit is the same step, the only different network uplink speed, the network uplink speed determines the Cloud Station synchronization upload speed. For applications such as my Word and Excel spreadsheets that have photos as the main application, once the file is changed, it will trigger synchronous upload. If the network needs, you can also pause the task and continue to synchronize the next time.
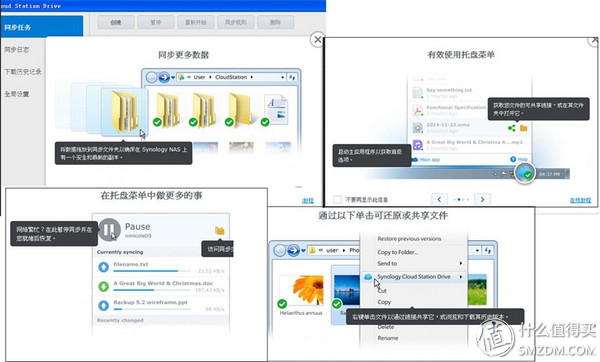
Cloud Station Drive software interface has a specific schematic, the interface is in English is a Chinese language, not completely localized, poor review ~ ~
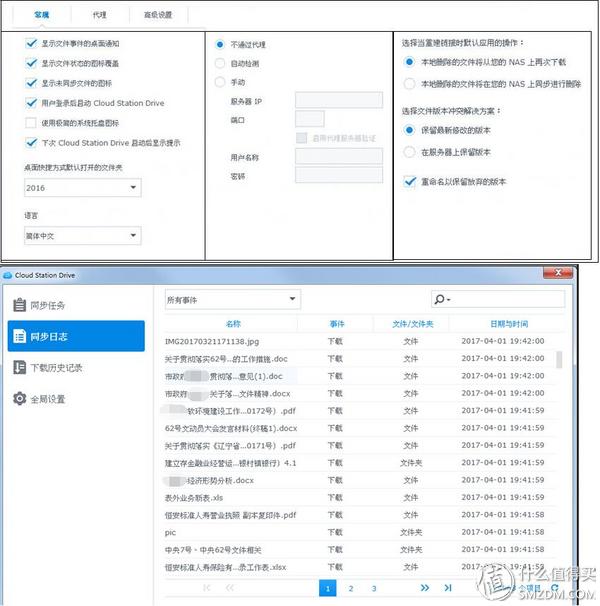
Advanced settings interface and synchronization log, synchronization log can view the status of synchronized files
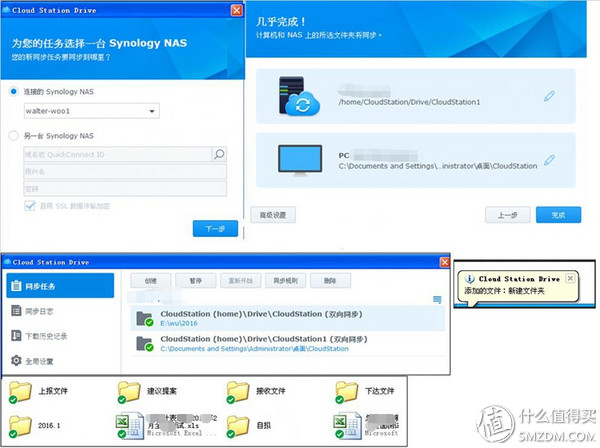
Adding a new sync task is also the same as setting it on-demand, which is very convenient
→ Cloud Backup (Cloud Station Backup)The cloud backup function is very tall, but it is quite simple. It is to back up the files on the computer to Synology NAS. It can not only save 32 versions but also can be viewed directly on the shared folder.
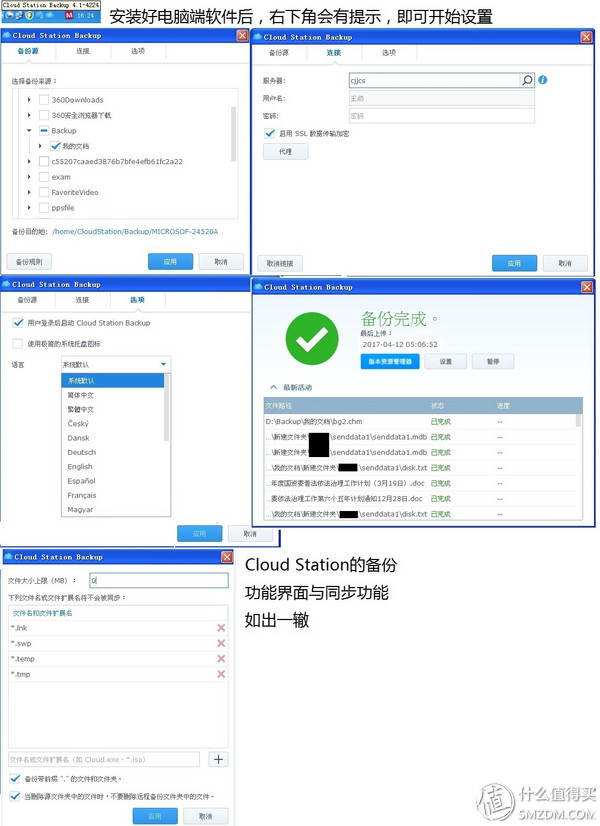
Cloud Station backup function interface and synchronization features exactly the same, you can choose the backup content and backup destination, if there are special requirements, you can also set backup rules, such as the suffix name, backup file size. There are three main differences from synchronization: First, variable backup can be performed, 32 history versions can be saved, and file revision records can be traced back; second, one-way backup (computer-side backup to NAS); third, version resource manager, Used to select the backup version
The Cloud Station Backup in DSM 6.1 adds a timeline record to the PC software, which is the version resource manager. If you want to restore the files that were deleted by mistake, you can do it yourself, which is much more convenient than the 6.0 version.
→ NAS synchronization (Cloud Station ShareSync)If you want to synchronize data between two Synology NAS, you need to ask Cloud Station ShareSync
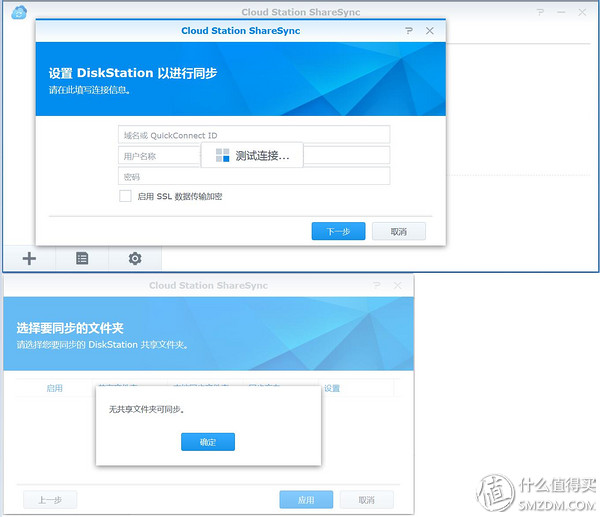
The first is to set up QuickConnect to synchronize two Synology NAS, but after the connection is successful, there will be a prompt “no shared folder can be synchronizedâ€. I am not trying to play, but Qunhui is not here. A warm prompt appears, suggesting that synchronization cannot be performed between NASs only by enabling the default "user home directory" to enable synchronization, that is, the "home" or "homes" folder cannot be synchronized. How to set the specific please see below
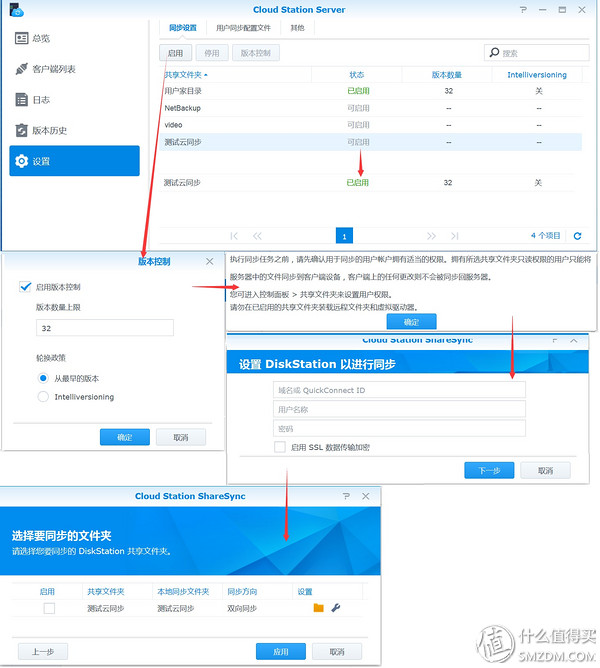
In the left setting of the Cloud Station Server, you can enable synchronization for the folders that need to be synchronized. The next step is to set options such as the number of synchronization versions. After the synchronization folder is enabled, you can complete the settings.
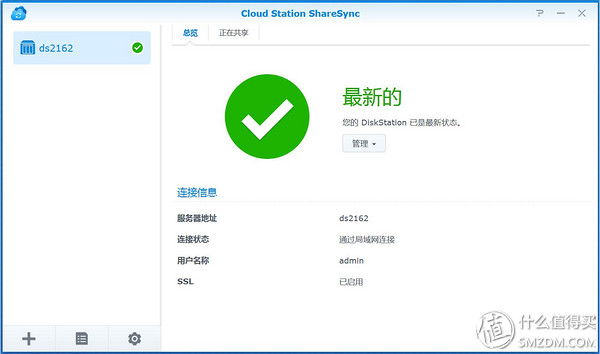
Start the synchronization task. Note that this interface is only displayed on the Synology NAS with the synchronization task setting enabled. The Cloud Station ShareSync of the Synology Cloud NAS is not displayed on the interface.
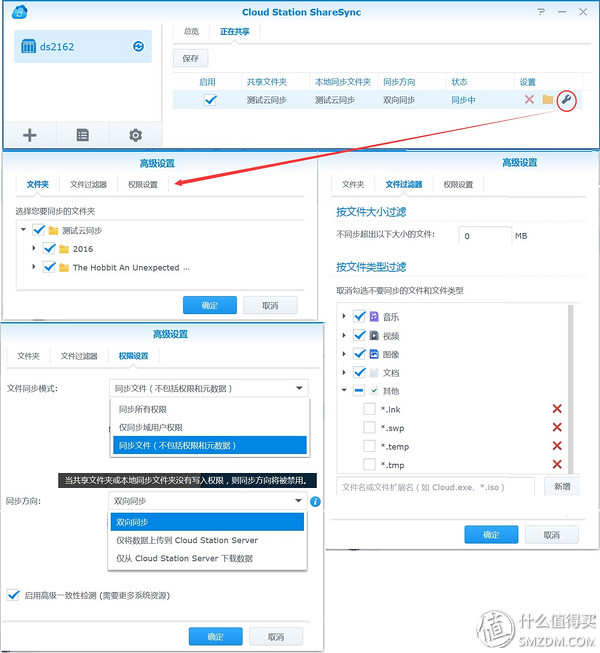
If you want to modify the sync folder, you can click on the syncing task's sharing options, there is a wrench-like icon instant advanced settings, you can set the folder, file filtering and permission settings, but the permission settings are mainly robust sync mode and Synchronization direction
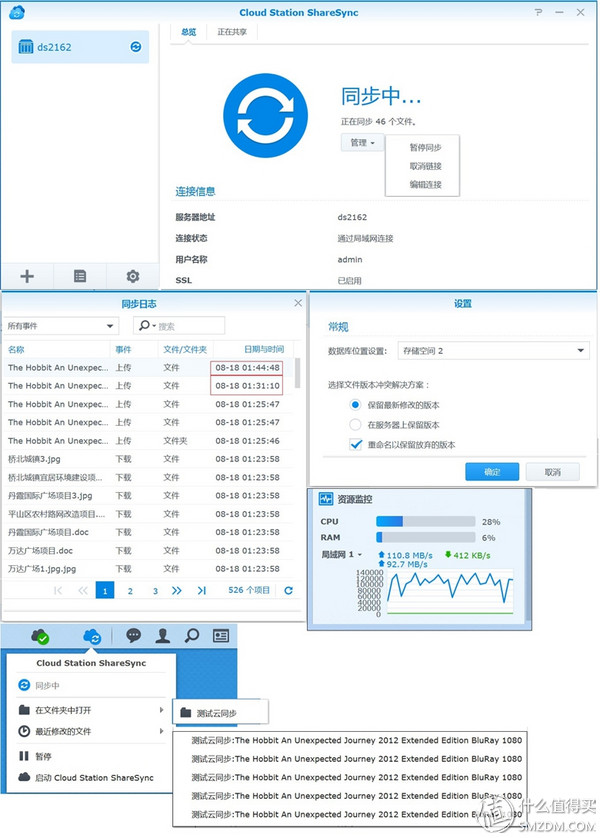
Synchronous transmission speed between Synology NAS in the same local area network uses DS916+ and DS216+II as an example. When a 20G high-definition movie is copied into the synchronous target folder of the DS216+II using a removable hard disk, synchronous transmission is already started, and the highest speed can reach 110.8. MB/s, the low point is 92.7MB/s, the first 4 files in the screenshot are small files, and the 5th file is the 20G master file.
It can be seen that the transmission speed of synchronous tasks in LAN can reach full speed, and the synchronization version can also save 32.
→Cloud personal experience & BUG pointed outDSM 6.1 official version of the Cloud Station and the 6.0 version compared to almost no changes, local and remote synchronization I and my friends have not encountered any problems, DSM6.1 maintains a large number of scattered files on the DSM6.0 synchronization speed optimization.
The reason that Synology's Cloud Sync did not test is that many organizations and enterprises' files or data are not suitable for cloud disk. Moreover, since the network disk was closed down from last year, it is difficult to guarantee its own security. In addition, Synology NAS can perform remote locations. Multi-machine data synchronization. Imagine a computer file, one in Synology NAS (if it is SHR or RAID5, etc., equivalent to one more), X in remote Synology NAS, as long as it is not a particularly small probability event, it should be enough Safety.
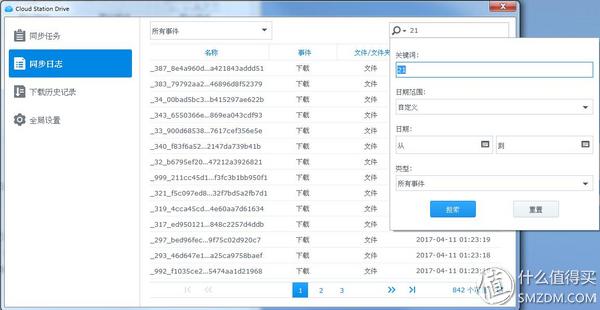
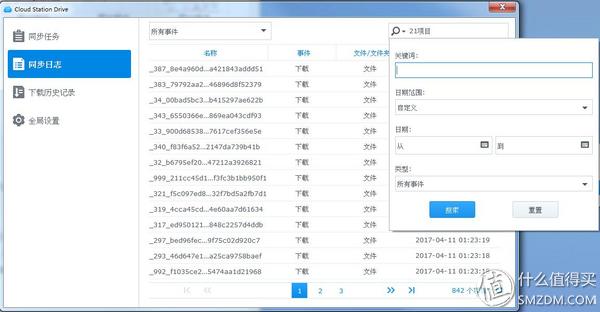
However, there is a small BUG need to point out that that is Cloud Station Drive computer software search function, if the first search is a digital and pull-down menu opens, then in the drop-down menu, enter the content you want to search is not displayed And there is no role, as shown in the figure below, it is not difficult to break, do not open the drop-down menu, just search directly.
This is the old-fashioned function of Synology NAS. The difference with Cloud Station Cloud Backup is that Hyper Backup backs up the files on the NAS machine, and it is not a real-time backup. Instead, it is set to run automatically after the backup task is scheduled. Cloud Station Backup is a real-time backup of files on your PC.
If the enterprise or institution that frequently changes data, the 32nd version that Cloud Station Backup backs up and saves in real time may not be enough. What if the changed data or document is found to have passed version limitation? Hyper Backup has come in handy. The backup effect of DSM 6.0's Hyper Backup is as follows:

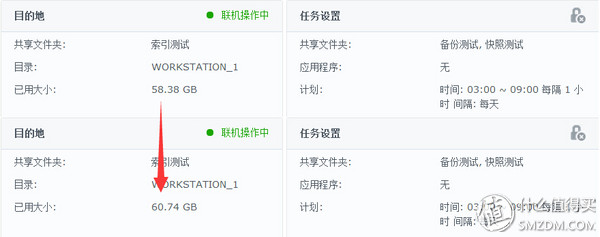
The variable backup is simply the backup of the test folder (occupied storage space 58.38G), delete the 2.6G file in the file, and then into the test folder 2G more different files, and then back up, The storage space occupied by the backup is only 2G more than before. (If you do not delete the previous version, if you do not delete the previous version, this backup will overwrite the previous version. The default backup saved version is 256 copies. No one will set only Save 1 copy of it), all backup files account for 60.74G.
In DSM 6.1, there are two seemingly minor changes. One is that Synology has redesigned the special format files generated by Hyper Backup backup. After the backup is completed, the backup files can be loaded and can be directly Viewing and restoring backup files on the Windows system greatly improves the experience of browsing and restoring the backup files. The other is the deduplication technology that is upgraded to cross-files based on the variable backup of the DSM 6.0, and compares different departments and jobs in the backup. The personnel file data file does not back up duplicated data. That is to say, two departments each have 2T data files, but 1T is exactly the same, then the backup will back up 3T file data instead of 4T. The effect is that backup disk space utilization efficiency is improved, but there are other effects as well, see below.
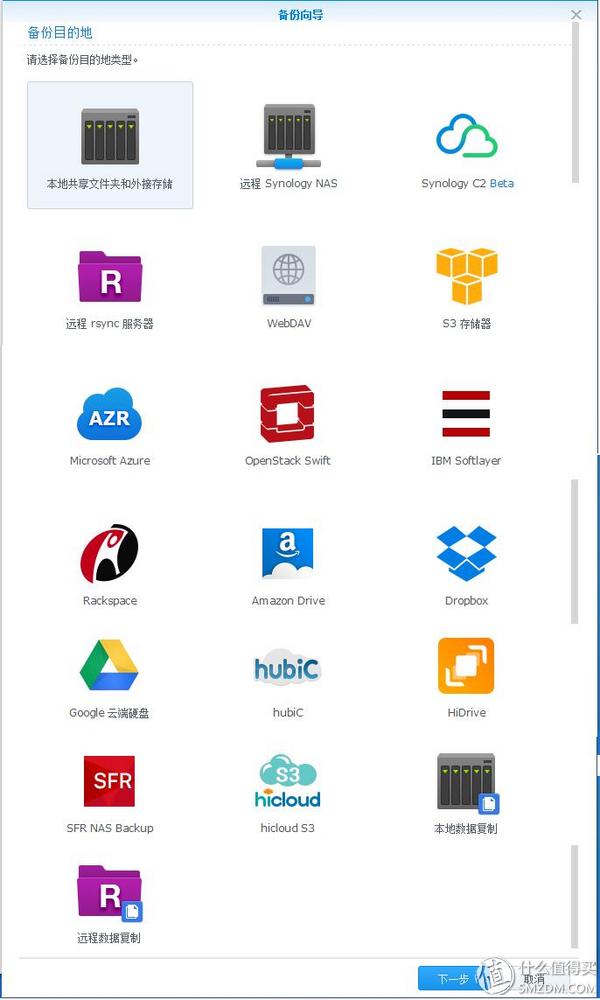
There are many functions of Hyper Backup backup. DSM6.1 has added Synology C2 Beta to 6.0. The main four selected for this evaluation are local shared folder and external storage, remote Synology NAS, local data replication, remote Data replication
→ Local shared folder and external storageThe specific steps to start the backup task are as follows
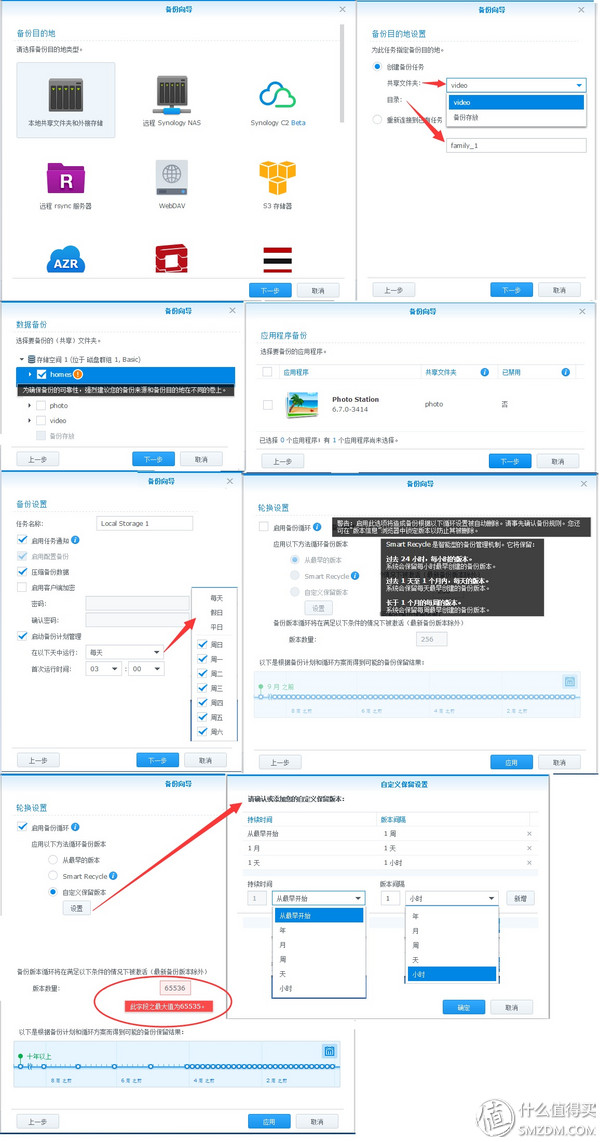
Each step is concise and clear. First, select the backup destination folder, and then select the folder to be backed up. The next step is application backup, backup settings, and rotation settings. Among them, the application backup is a newly added step in the official version. It is dedicated to back up the relevant data of the suite and is very intimate.
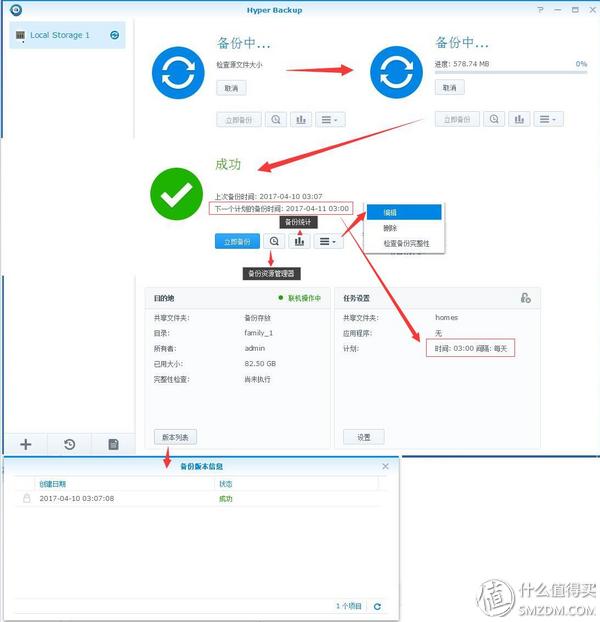
Because of the variable backup method used by DSM 6.1, if the backup target file is not changed or the changes are minimal, the backup will be very fast according to the scheduled task. If you want to increase the number of files in the original backup folder Backup, you can add related folders in setting or editing. If you want to adjust the backup interval or version replacement method, you can edit the third option after the backup immediately or in the settings in the task setting column, as shown below
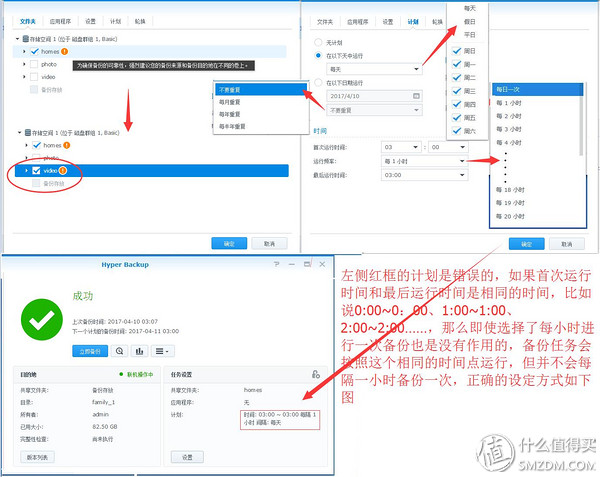
Backup can be done every hour after successful setup, and the data can be changed more safely. (Please note that the red box above is to remind me that this operation is wrong. The selection operation in the above figure is correct.)
The main interface also has backup statistics function, as shown below
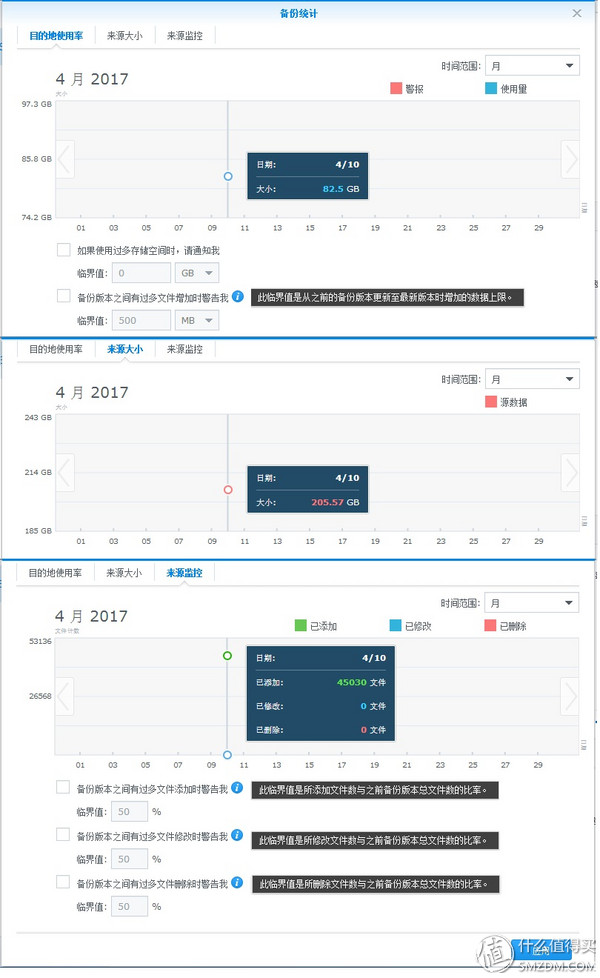
The backup statistics function is mainly to check, prompt and warn about the increase, change, modification and deletion of data, and an intimate hint
special reminder:1Hyper Backup backup files are stored in a proprietary format, but after the DSM6.1 upgrade, you can directly mount and read the contents of files in the shared folder, or open the backup explorer for operations such as finding and copying. Find a small part of the file, without having to do a large restore coverage, much more convenient than the previous version. As shown below
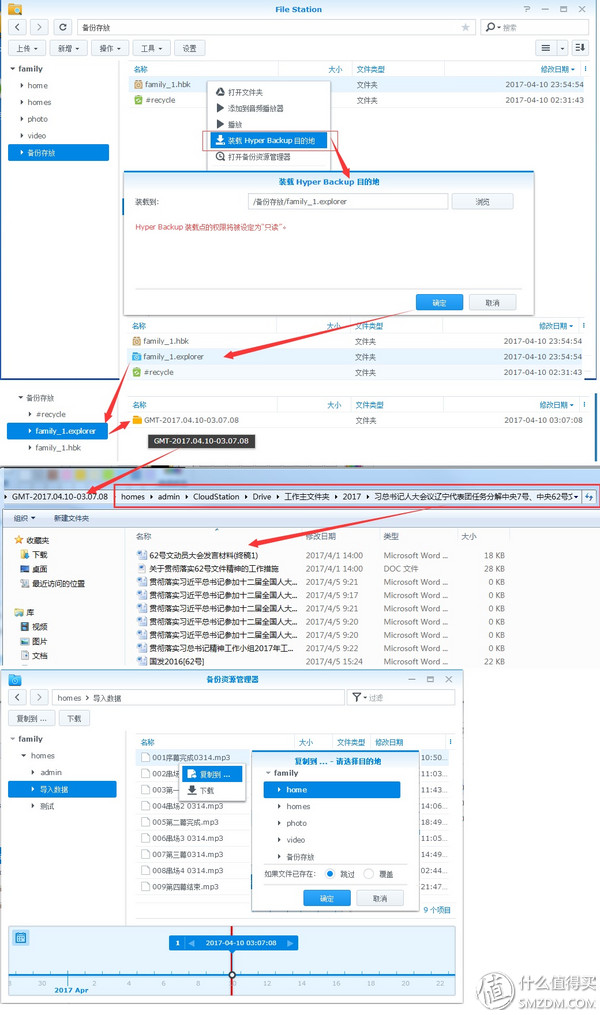
2 As shown in the following figure: The volume of the 210G homes folder after backup is only 82.5G. This is the recent technology of Hyper Backup backup → cross-file deduplication technology. When the backup task runs, it will compare the duplicate file data.
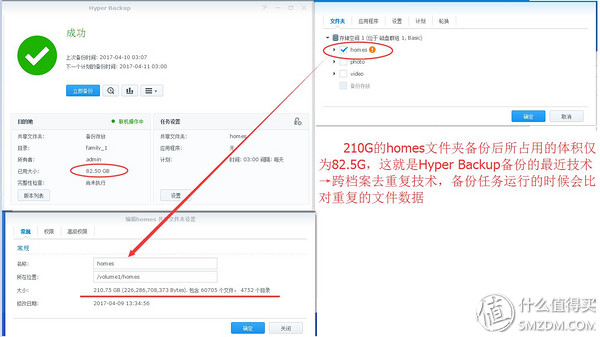
However, it should be noted that don't just listen to the group's benefits, although cross-file repetitive technology will greatly save disk space, but it will affect the time for the first backup. The more backup data, the more complex and time-consuming, but due to the The second time only backs up the variables of the original data, so if the amount of data changes is not large, the time required for the second backup task will be greatly shortened. It should be noted that the performance of Synology NAS directly affects the speed of the backup operation. The precipice is a conspiracy for Quhui to induce us to upgrade the machine.
→ Remote Synology NASThe remote Synology NAS function is to backup the local data to another Synology NAS through the LAN or the Internet.
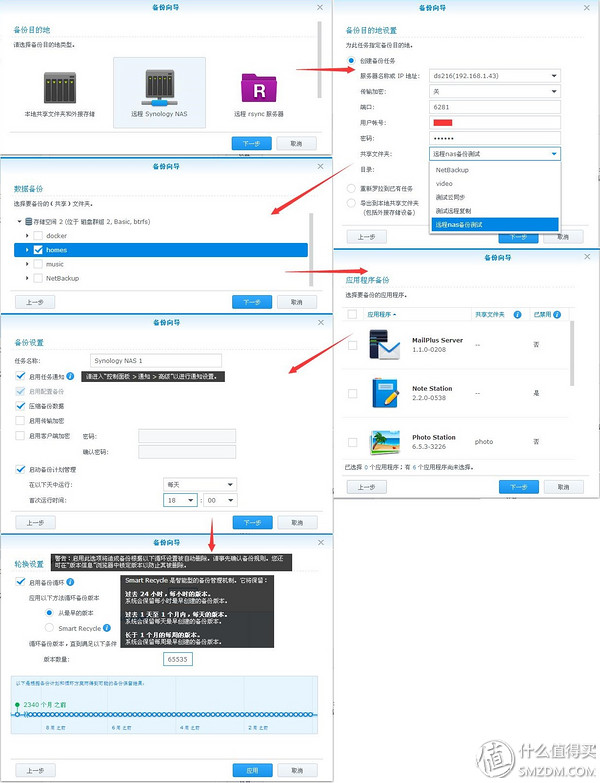
Like the local shared folder and external storage backup, each step is very concise and clear. It adds the automatic search for the backup destination settings of Synology NAS in the LAN, selects the destination server for the backup, the destination folder, and needs to be backed up. After the folder, the next step is application backup, backup settings, rotation settings.
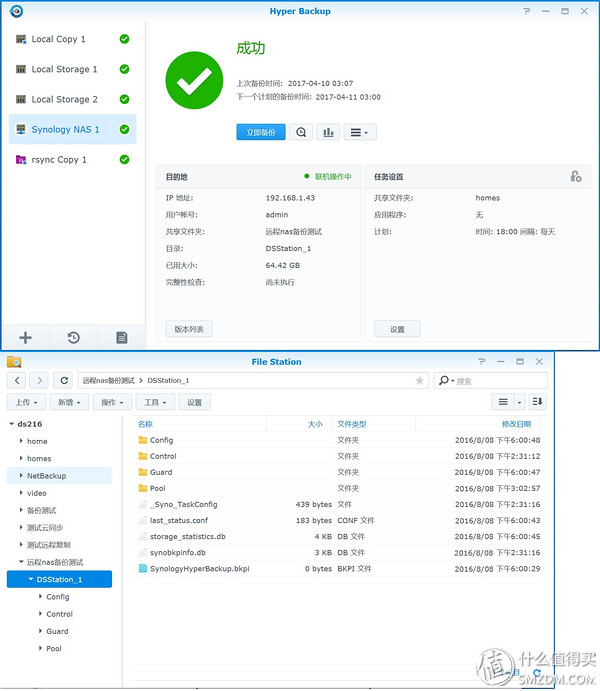
After the remote backup task is completed, an image is displayed, showing the last backup time and the backup time of the next plan. The backup task folder is also created in the backup destination folder on the DS216+II. Note that DSM 6.1 Hyper Backup backup files can already be mounted in a folder and need not be restored or read through the Hyper Backup Explorer desktop tool
Local data replication, this function is to copy the local folder to another local folder
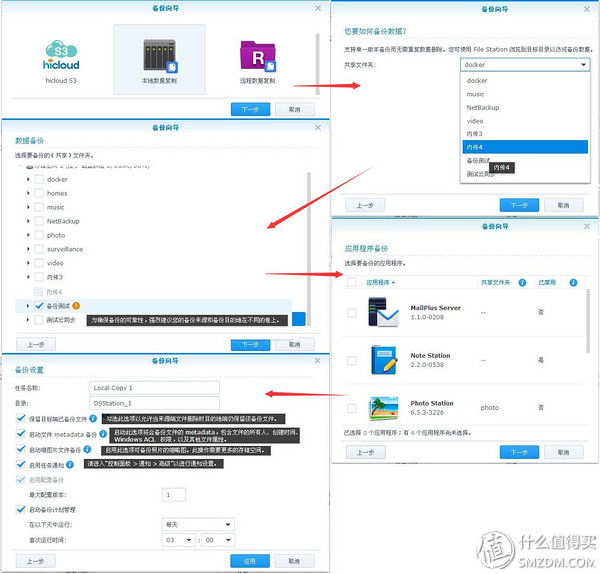
The setup process is not difficult, you can select the options according to the requirements, first select the backup destination folder, then select the backup destination folder, there are intimate tips in the main steps, for example, it is recommended not to copy the local copy data to the same Within a volume, there are various detailed options in the final step of the backup wizard. The default is generally for individual users. However, there are detailed requirements or need to be carefully selected by corporate users.
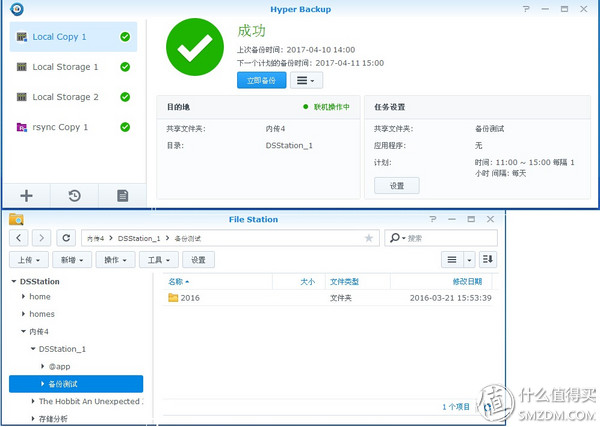
After the local replication is completed, the figure is displayed, showing the time of the last backup and the backup time of the next plan. Hyper Backup's locally copied folder can be viewed directly in the File Station and shared folders.
→ Remote data replication
Remote data replication is to copy the data of this Synology NAS to another Synology NAS or compatible rsync server.
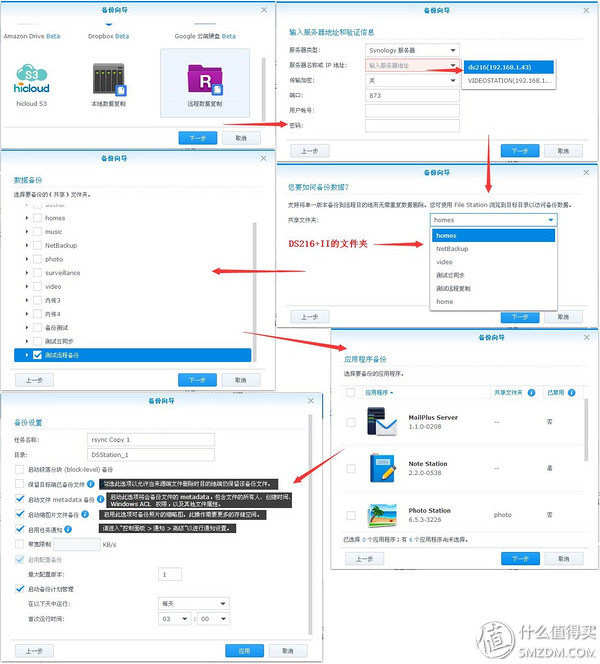
The setup process selects more server addresses than local replication, then selects the backup destination folder, then selects the backup destination folder, and in the final step of the backup wizard there are various detailed options for the intended use of remote data replication. Both have users with more than two Synology NAS, it is recommended that users who need detailed or corporate users should carefully choose
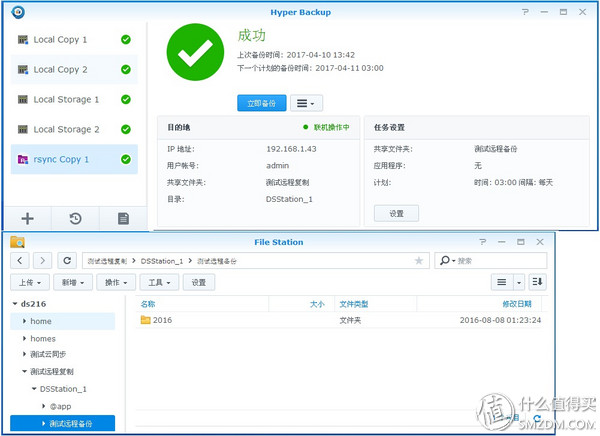
After the local replication is completed, the figure is displayed, showing the time of the last backup and the backup time of the next plan. Hyper Backup's remote copy function duplicates the folders that can be viewed directly on the File Station and shared folders: local copy and remote No backup resource manager and backup statistics are duplicated on the main interface
→ RestoreThe restore function not only restores to the original folder when DSM 6.0, but also selects the backup file or folder to be copied to the specified folder in the backup explorer. Now DS, 6.1 can also be directly on File Station. Select the group's proprietary backup file (*.hbk) to mount and read directly in the windows network folder. It can be said that it is the gospel of users with large data volumes.
→Hyper Backup Personal ExperienceAlthough DSM 6.1's Hyper Backup backup is not a big change compared to DSM 6.0, but each item is icing on the cake, it maintains the excellent tradition of file changes (occupying storage space, non-quantity) backup, and also increases the number of The file deduplication technology is good news for institutions and institutions with large historical documents and small and medium-sized micro enterprises, which saves space. And you can mount and read the backup file, so that you can use it not only to make users more comfortable, but also to reduce the disk loss.
Snapshot Replication and ReplicationSynology is a Btrfs file system that was especially recommended when the DSM 6.0 Beta was introduced. It can be used to quickly reply to files with the new snapshot feature.
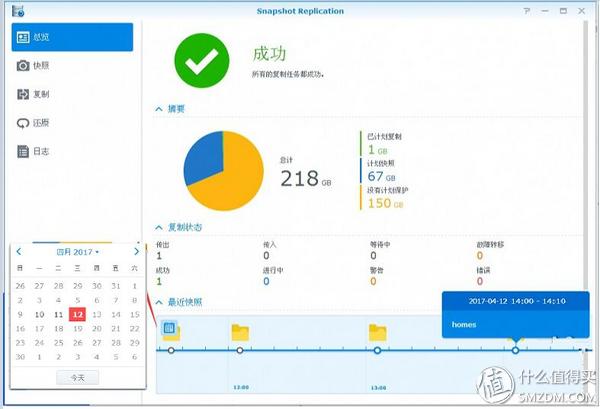
After the main interface is opened, it is an overview. It shows the data that is protected by the snapshot and takes up the proportion of the entire storage space and the latest snapshot marked by the time axis.
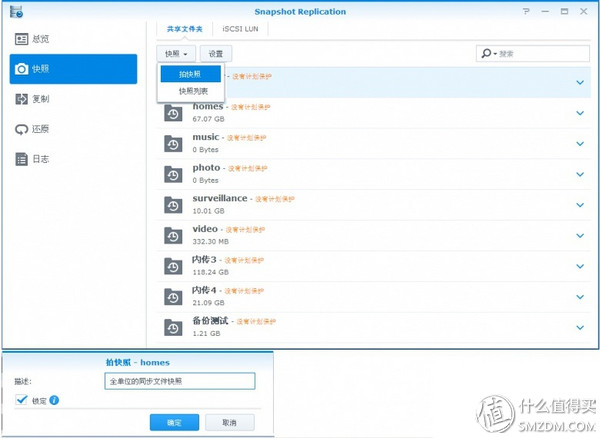
To protect the shared folder, click to take a snapshot
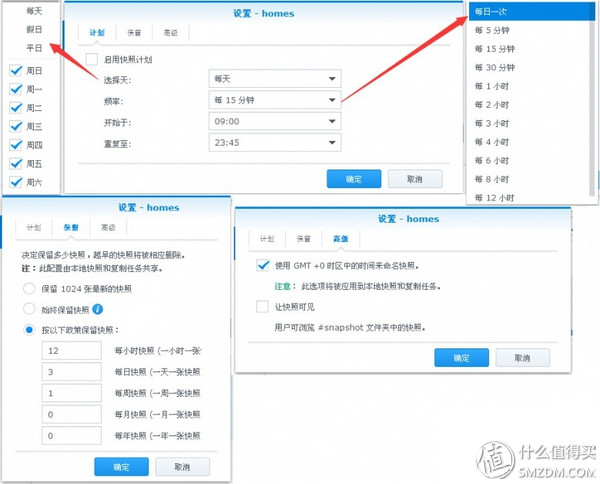
The procedure for setting a snapshot is only 3 steps, it is very convenient, but you need to carefully determine the options
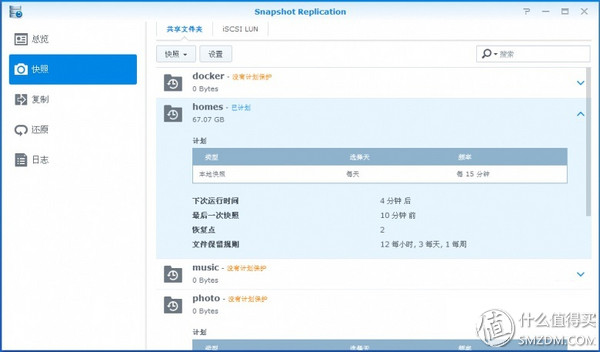
After the settings are completed, you can see the word "planned" in the shared folder list in the snapshot, which is different from other shared folders that are not protected by the plan.
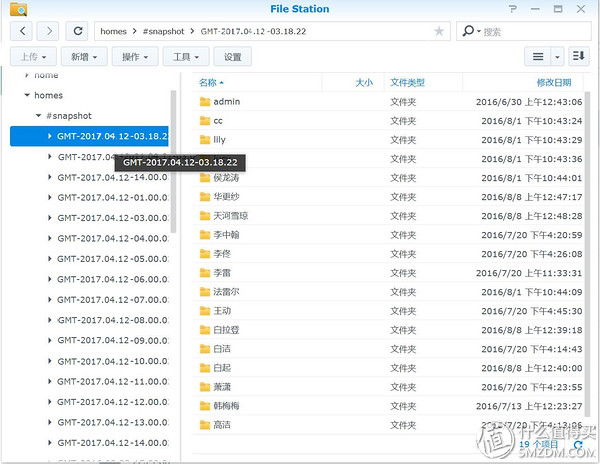
Select which shared folder to take a snapshot of. This will create a snapshot of the special folder, which contains all the snapshots, you need to open the change the shared folder "make snapshots visible" option, in the restore and specific Steps will appear, reminding to turn on the option, which is basically semi-automatic and visible.

Take the snapshot of the homes folder as an example. After the snapshot task is set up, a snapshot folder will be created in the homes folder. Each snapshot in the folder is a mirror image, which will take up a lot of storage. space
→ Restore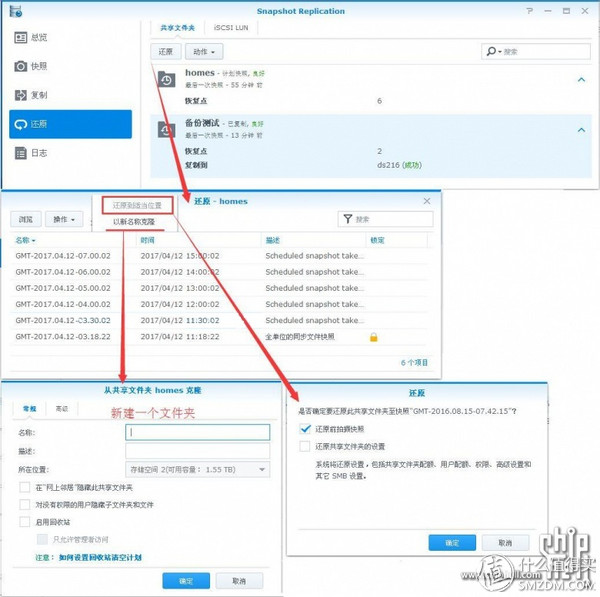
The restoration of the snapshot is also very convenient. After selecting the snapshot and selecting the recovery point, you can choose to restore it to an appropriate location (that is, restore to the original location) or clone it with a new name (in fact, create a new shared folder).
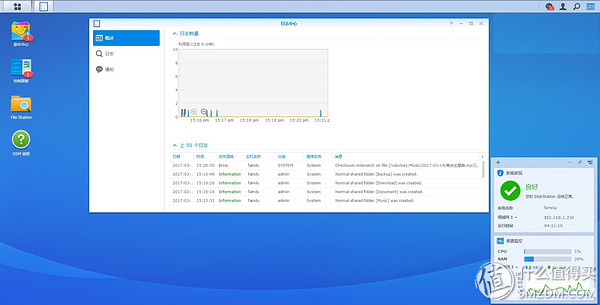
→ Automatic repair of files in Btrfs formatWriting a file in Btrfs format in Synology's promotional notes can automatically fix this new feature, because the snapshot suite and the Btrfs format are inextricably linked. To implement the snapshot function, the disk must be run in the Btrfs format, so I'll put it in a snapshot. Explain. This feature seems to be a big deal, saying that in the Btrfs format of DSM 6.1, the system can detect silent data corruption—undocumented data corruption errors, and it can automatically repair the wrong file data. Visually this function is a silent guardian, but I actually saw a prompt in the log center of a friend's Synology NAS, but it was not a hint that the file was automatically repaired, but a failure prompt o (╯□╰) o , As shown below.
In fact, the copy function of Snapshot Replication is the same as the purpose of remote backup of Cloud Station ShareSync and Hyper Backup. That is to directly save data on another Synology NAS, but the effect is different. It is necessary to pay attention to the copy of the target Synology NAS. There must be a Btrfs storage space and the source NAS home and homes folders cannot be copied. Next, use the DS99+ and DS216+ II as examples.
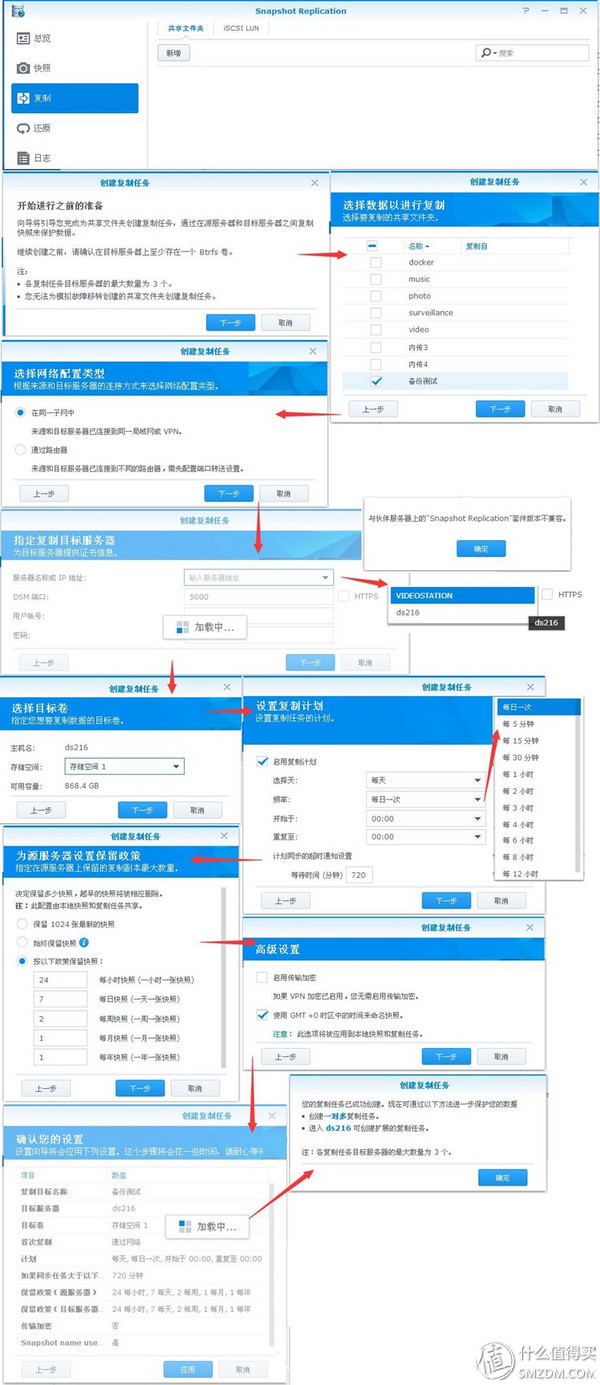
Replication is a data backup method that saves the data in the source NAS on multiple machines by creating a mirror image of the target shared folder on the target NAS and all files can be read in the image.
In the process of setting tasks, you need to pay attention to the two steps of the replication plan and the source server setting retention policy. One is to determine the replication frequency, and the other is to determine the number of saved snapshots. It is completely necessary for the enterprise to use the data according to the actual needs and the used clusters. Fai NAS's hard disk capacity is to be arranged, because snapshots are different from backup and cloud synchronization. Each snapshot is a mirror image of data.
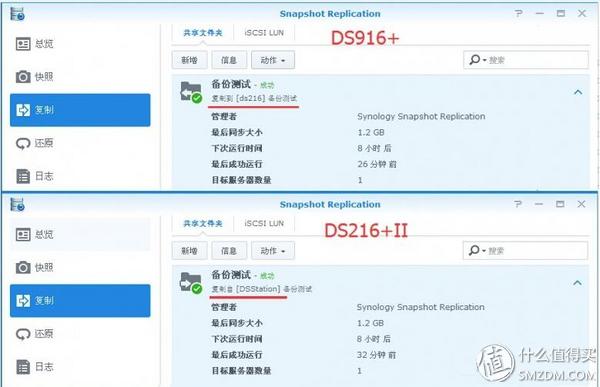
After the copy settings are completed, the DS916+ and DS216+II's copy interface will prompt success and display the source. The copy destination folder will be automatically set to read-only, preventing the size of the synchronization file from being modified and the next run time information to be clear at a glance. It should be noted that the maximum number of replication operations is 3, that is, up to 3 Synology NAS can be used as a snapshot backup machine.
In fact, when DSM 6.1's backup function is capable of mounting reads, snapshots and backups tend to be more or less consistent for individual users, but it's not that snapshots aren't a bad idea, because snapshots are fundamentally It is for government agencies and small and medium-sized micro enterprises to provide services because these organizations often have huge and complicated files. Snapshots have an additional layer of insurance on the basis of backups, and they have more advantages in the speed of production. Bigger and more obvious, plus the newly added file automatic repair function in the Btrfs format, it can be said that the double insurance was initially reached.
→USB Copy 2.0USB Copy2.0 is a new functional suite that is updated with DSM 6.1. It is applicable to all Synology NASs without the need to log in to Synology's web interface and directly access the USB external storage device. The files are backed up to the Synology NAS, which is the main cold backup method for Synology NAS.
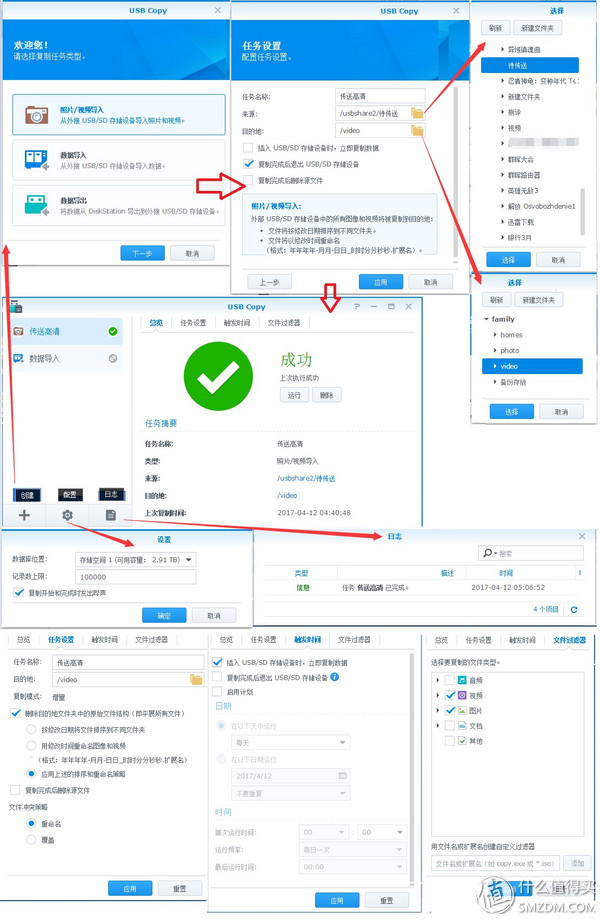
The first time you enter USB Copy's main interface, you will be asked to set the import and export tasks directly, giving you three options. One is photo/video import, the other is data import, and the third is data export. The specific settings are in task settings and file filters. In the photo/video import task setup, there are three main options. One is to insert the USB/SD storage device, immediately copy the data, the second is to launch the USB/SD storage device after the copy is complete, and the third is to delete the source file after copying. Must be careful! If not necessary, please ignore the third option)
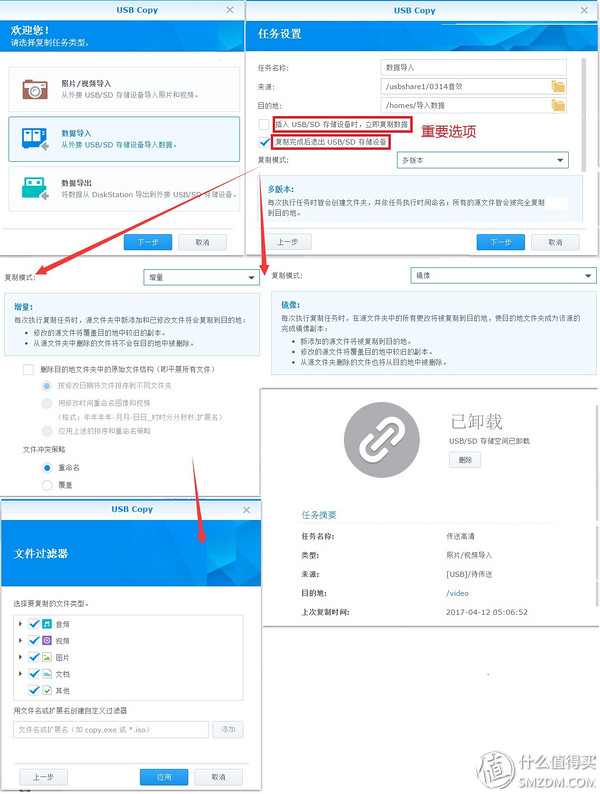
Data import task settings need to be very serious, because the data import is different from the photo/video import, there are three kinds of copy mode options, namely multi-version, incremental, mirroring, in simple terms, multi-version is inserted once, once each The import folder is named according to the task time; the mirror is the sample of your source folder, the destination folder is sampled; the increment is deleted regardless of you, the modified overwrite old, the new continue to import. And the incremental part has the option of deleting the original file structure in the destination folder (that is, flattening all the files). Please use it with caution because the files in the subfolders under the source folder will be detached.
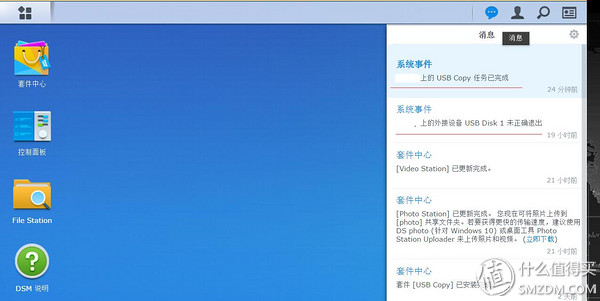
After the task is completed, a prompt will be displayed in the message bar in the upper right corner of the main interface, and a short beep will be displayed (configurable on the main screen. If the USB device pops up after the setting is complete, the device can be directly pulled out. The
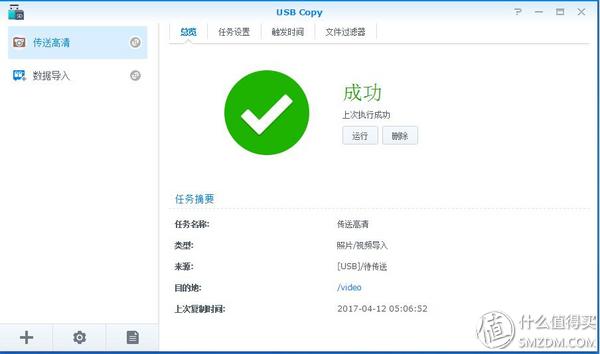
The main interface can display the running copy tasks, and there will be a green check mark
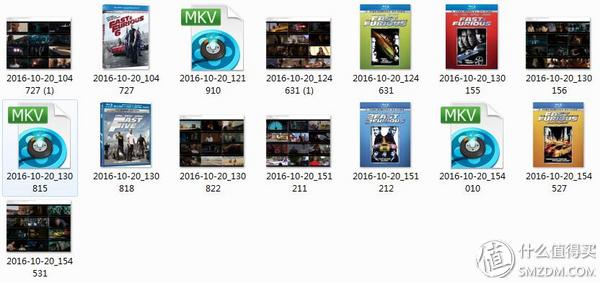
Be cautious about using the "Delete original file structure in the destination folder (that is, flatten all files) to rename the image and video with the modification time." Otherwise, transferring the HD file will result in the file being renamed.
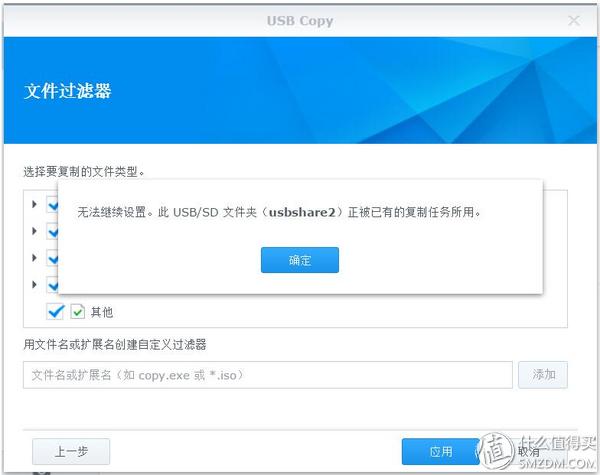
It should be noted that within the same usbshare, only one copy or export task can be run. If you want to set to copy and export in the same usbshare, the above figure will pop up.
→USB Copy Summary USB Copy looks like a little dessert-like feature set, but it is very good for people who often have cold backup requirements and who have high-definition download sharing, because it can be downloaded by setting an important folder that requires cold backup or HD download. Folder data import or export, access the USB storage device can automatically import all the files into or export, can be said to set up, plug in the USB storage device can sleep, can be considered lazy gospel.
It should be noted that one is not a BUG issue. Some USB devices, such as some hard disk holders, have compatibility issues with U-disks. Orico6638 is known, and several old-branded U-disks are not recognized. Use compatible devices as much as possible. The official compatibility List official portal
Synology NAS's three data security masters - Synchronous - Cloud Station, Backup - Hyper Backup, Snapshot - Snapshot Replication and recruits USB Copy2.0 detailed here to almost, and originally intended to write in this article how three fierce With the use of, because of space considerations (this article has nearly ten thousand words), the next chapter of the group Hui DSM 6.1 explain again through examples to explain how to play with these few fierce battle to protect data security.
Although Cloud Station synchronization and Snapshot Replication snapshots inherited the DSM 6.0's outstanding performance in DSM 6.1, because Hyper Backup backup not only built cross-file replication technology, but also showed off dedicated backup files, greatly reducing the disk While space facilitates the lookup of historical documents, synchronization and snapshots are not so obvious in the small upgrade of DSM 6.1 (Cloud Station Backup's backup timeline and Snapshot Replication's encrypted document snapshot) compared to the big step of backup. . Also worth mentioning is that the Btrfs format (to implement the snapshot function must make the disk run in Btrfs format) provides a new feature, that is, the file is automatically repaired, but as I have seen in the evaluation, this feature may be reported Announcement, that is, the repair is successful without prompting, only prompt repair failed files.
To get the weapon to exert its full strength, it is necessary to understand it first. If you want to master it, you must first master it. Many people say that Huihui does not use well and is not easy to use. It is often not used, just like you. Handed the sunflower book, only to see the first page of "To practice this skill must first self-palace" is tangled, but did not see the next page, "If not from the palace can be successful"; singular Dr. Strange is also Having said that, it is necessary to look at the specification and hope that this article can play a valuable role, thank you.
Outdoor Full Color LED Display P4 Rental,which made from die cast cabinet, it is easy maintenance. Outdoor Rental LED Display using the distribution and modular design to improve the stability of the LED Screen control system. P4 LED Display widely used in Outdoor Rental Projects, like Performances, Forums, Weddings, Conferences etc. Looking forward your early response!
Outdoor P4 Led Display,P4 Outdoor Screen,P4 Rental Led Display,Outdoor Rental Led Display
Shenzhen Jongsun Electronic Technology Co., Ltd. , https://www.jongsunled.com